Leaderboard


Popular Content
Showing content with the highest reputation on 01/12/21 in all areas
-
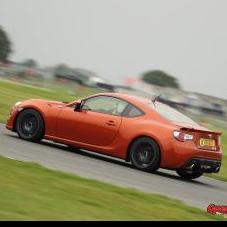
2 pointsAs the lockdown tennis continues I took full advantage of Black Friday deals before Christmas and decided it was time to address a few items that were always on the list First up was getting a new set of wheels, I’ve been running a set of 18 x 7.5 OZ Ultraleggera for the last number of years and it’s limited me to 225 section tyres, and now with the extra grunt traction can be an issue on all but the newest tyres, I’ve got around this by running slicks in the summer but its limiting when you get a spot of rain (as we often do in Ireland) So I opted for a set of Konig Hypergrams 18 x 8.5 et38, and later fitted some Nankang AR-1 255/35 so they should offer a nice bump in traction (the photo below is just the old set of R888R 225s I threw on for test fitting) While I was fitting the new wheels I got distracted and decided to fit a tyre rack to my trailer so I could at least fit some wets to the old wheels and bring them with me Upto this point I’ve kept the external of the car pretty standard looking, but I always intended to fit some functional aero and I’ve always been tempted by the Verus Engineering parts, so I took full advantage of their Black Friday deals and bought this lot! First up was fitting the adjustable front splitter, I opted to install it at 5” extension just too see how it will work, However the install of the front splitter was not straight forward as anything beyond a 3” extension meant that two of the tie rods would extend beyond the bumper, I ended up drilling two new mounting holes further back and making two offset brackets, I also ran into issues with the length of the tie rods, which at 5” were running at max extension with very little thread engagement left within the turnbuckle, so I installed some spacers behind the crash beam brackets to allow me to shorten them a little. I also went with the accompanying end plate and canards, while installing the end plate I decided to reinforce the bumper edges with some aluminum backing plates just to give the rivet nuts a better chance of staying put! Finally all were installed With that lot sorted I’ve still got the rear wing, and bonnet vents to fit. I’ve also bought the Verus steering angle limiting kit, as the wisefab kit has given me some extra lock but on full the tyres are touching the inner wheel arch As my persistent 2nd gear grinding continues I also bought a new set of Verus carbon synchros that I’ll get fitted at some stage, and finally my battery was shot after 4 yrs of trickle charging and trackdays so I replaced it with a new Odyssey PC950
-
2 points

How do we report a user
MartinT and one other reacted to Lauren for a post in a topic
Sorry Martin! Sorted. -
1 point

What I did to stop rattles for my brz
LGE reacted to Jay Bamrah for a post in a topic
I know theirs 1000 posts on this but I think the more people that post on it the better. Each post might have something of value to someone so I wanted to as well. first rattle is here this is what it looks like exposed... The plastic clips rattle here so I used adhesive foam on the bottom of them(link at bottom to cheap foam) Next rattle is this ... the exposed part is made of plastic and so I put adhesive foam here (this is the bottom of the back seat) next is here ... This corner piece on both ends rattles against the glass window, I filled behind it with foam. The hole here is what hole you need to push foam through to fill it, i recommend you put your finger in first to feel where it needs to go, photo of hole is below... next is here... (at the top of the window that plastic piece) the roof liner is lose you can easily get small chunks of foam and push them in there hidden... next place ... this area in general, I know it looks ugly how I did it but it’s all invisible when the seats are back so I don’t care, I just made it tight as hell, no movement.. next... this is where the break light is... that piece, I put foam on the edge where it sits against the back seats as it was plastic on metal and had movement... next... next is all of the holes in the boot, this pushes the third break light up so it can’t vibrate on the glass window. I filled every hole and put duck tape there to make sure it doesn’t pop out. Also every cable here I made tight so they can’t move about here is one extra photo Next part... this is the obvious part, I put foam where the wheel arches are and then I put adhesive 3m foam EVERYWHERE after that, im sorry I have no photo of that but you know what I mean, the entire boot is covered in 3m adhesive foam. Hope I had some stuff useful to you. THIS IS THE FINAL LOOK FROM BOOT...oh I also did that part on the boot door I just took that off and put foam underneath, makes opening and closing the boot feel nicer too hope I can help someone ADHESIVE FOAM - https://www.ebay.co.uk/itm/3M-6mm-Car-Sound-Proofing-Deadening-Camper-Van-Insulation-Closed-Cell-Foam-Sheet/184106555361?pageci=20637d0f-8686-41bb-9ca2-a8a4cfb8a525 REGULAR FOAM - https://www.ebay.co.uk/itm/FOAM-SHEETS-CUT-TO-70-x20-x1-TO-5-IN-DEPTH-DENSITY-HARD-MED-SOFT-/264125917402?pageci=c327efe7-12b0-4865-a00d-33d9dedbcdb8 ——————————-THE END—————————— -
1 pointYep all the oil cooler thermostats let a little oil past even when closed. This is to better balance the temp difference to prevent thermal shock of the thermostat opening and then suddenly a load of cold oil rushing into the engine. But the oil being too cold can be just as bad as it getting too hot. So some people block off their coolers until they get to track. I put a square JDM front numberplate on and as it hangs down in front of the vent it blocks the airflow to my Mishimoto oil cooler enough to get heat in the oil for daily driving. I then just take it off or put the UK style plate back on when I get to the track.
-
1 pointiirc even with a thermostat they are always slightly open, which means they run colder. Don't listen to people who say oil has to get to 100c to burn off condensation though - if that was the case puddles would never evaporate from the street, but they do. The cheap HEL kits and possibly TD (I'm not sure) use generic angled couplings which have clearance issues with the airbox, and lot of people have to hack it up to prevent rubbing. I think Deacon spent a fortune making up a custom airbox to get around it. What you're getting with the HKS kit is a bit more thought put into it, and where the cooler goes.
-
1 point
BRZ mud guard
Jay Bamrah reacted to gavin_t for a post in a topic
I haven't got any long scratches just a few chips. Mainly down to the Toyota paint been a bit thin and fragile. Plus I think some of mine are down to track days etc and debris flicking up. -
1 pointI hope it wasn't that terrible he's sending me nudes later.
-
1 pointI have an oil pressure gauge in my eyeline and only ever noticed pressure dropping at Coram at Snetterton, when I was using AD08R tyres on a really warm day. It wasn't dropping that fast but it was coming down. Never noticed it anywhere else.
-
1 point
BRZ mud guard
Jay Bamrah reacted to gavin_t for a post in a topic
Wait until you fit bigger wheels, crud everywhere . I was thinking of getting some PPF film on the rear arches at one point -
1 pointThe green gunk does hang around for a while. It's just a protective coating that is a magnet for dirt and dust mainly.